Manicures and Nail Care (3)

Previous Page
The Basic Manicure:
Step One: Wash your hands thoroughly and carefully and dry them completely. Be sure to use your nail brush to clean beneath the free edge and in the grooves along the sides of the nail. Your nails are somewhat porous and will become softer when wet. When they are wet they become more easily damaged.
Step Two: Trim your nails to the desired length. This is always a personal decision, some people like their nails longer, while others find that shorter nails better suit their lifestyle. Some people's nails are thinner and more flimsy than others and cannot support more than a minimal amount of length before they break.
Always try to keep your nails an even length when compared to the other fingers. Begin with the little finger on each hand and work your way inward. The goal is uniformity.
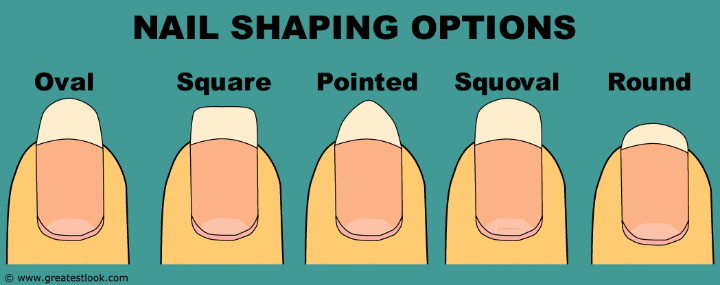
The Round shape follows the curve of the fingertip and is usually shorter in length extending only slightly past the tip of the finger. Many men prefer this shape when manicuring their nails.
The Oval shape is longer with a rounded end and is considered the strongest of the shapes based on the experiences of nail technicians. It can be difficult to keep even lengths with oval shaped nails, but practice and experience will pay off.
The Pointed nail is tapered to the center of the nail, although it is rarely shaped into an actual 'point'. This shape looks best on women with long slender fingers.
The Square shape is one where the nail is trimmed to a specific length and the ends are filed to a straight edge. The corners are filed only enough to remove any truly sharp corners to prevent accidental scratching. Many men like to have their nails filed into a short, square shape.
The Squoval shape is relatively new, and came about because of the number of people who liked the look of the squared nail, but needed the added structural strength of the oval. It is simply a square nail with the corners rounded.
Step Four: Once your nails are the desired shape, examine your cuticles. If they are growing down onto the nail plate or appear to be sticking to the nail plate, you need to push them back. Apply a dab of lotion to each fingertip on the cuticle, and massage it in. Give the lotion a few moments to soften the cuticle and then take your cuticle pusher or orangewood stick and wrap the tip in cotton. Gently rub the padded tip along the nail plate at the base of the nail and push the cuticle back away from the nail.
Be sure to rub away any remaining dead skin residue. Gentle is the key here; the cuticle is usually very sensitive and can be painful when damaged. A light touch is usually sufficient to push back any cuticle.
Step Five: Examine the nail plate. If there are any ridges in the nail plate, you can use the sanding block to gentle grind them down. Gentle pressure and small circular motions work best. Once the surface of the nail plate looks and feels smooth, you're done.
Step Six: It's time to finish your nails. Some people simply want a coat of clear polish for a clean, glossy look. Others - mostly women - like to have color applied. Many men don't like the idea of even clear polish, and prefer to have their nails buffed.
Next Page First Page